Saturday 16 February 2019

Keep Newest Log files and Purge Files Older than n Runs

The below find command helps you to Keep Newest Log Files and Purge Log Files which is older than n Runs.

This helps us to keep the Directories Clean without keeping older Log files which are no longer required.

# find /var/test/*.log | sort -nr | tail -n +4| xargs rm


 The above command will delete the log files in the /var/test directory which is older than 3 Runs,  Increase the tail -n +(n+1) value to purge the log files greater than n runs.

To Purge log files older than 10 runs #find /var/test/*.log | sort -nr | tail -n +11 | xargs rm


Monday 29 May 2017

AutoSys Scheduler: Create and Manage Jobs

AutoSys is used for defining, scheduling and monitoring jobs. These jobs can be a UNIX script, java program or any other program which can be invoked from shell. Before starting we assume that user has already setup an AutoSys environment. This environment consists of autosys server and autosys client.

AutoSys System components:

1. Event server (AutoSys database)
2. Event processor
3. Remote agent


AutoSys Functionality:


Defining Autosys job

There are various parameters to define autosys job. Starting from profile, timezone, start time, starting condition and so on. There are the two methods you can use to create job definitions:
1. Using the AutoSys Graphical User Interface (GUI).
2. Using the AutoSys Job Information Language (JIL) through a command-line interface.

In this tutorial we will use JIL language to create autosys jobs.

JIL stands for Job Information Language. Using this you can instruct autosys to save job definitions. This information saved in autosys database. You can also create a jil file which contains job definition. You can then pass this jil file to autosys.

Essential attributes for defining job

1. Job Name
JIL Keyword : insert_job. Name used to identify the job.
2. Job Type
a. JIL Keyword : job_type. The job type is one of job types: command (c), file watcher (f) or box (b).
3. Owner
a. JIL Keyword : owner

The job owner specifies whose user ID the command will be run under on the client machine. This attribute is automatically set to the user who invoked jil or the GUI to define the job, and cannot be changed except by the edit superuser.

Other job attributes:

1. command: The command attribute can be the name of any command, executable, UNIX shell script or batch file, and its arguments.
2. machine: This attribute specifies the client machine on which the command should be run.
3. date_condition: The start date/time dependencies attribute is a toggle, which specifies whether or not there are date, time, or both, conditions required for starting the job.
4. days_of_week: The days of the week attribute specifies the days on which the job should be run.

Sample jil file for command job echoJob.jil

insert_job:echoJob
machine:unixMachine
owner:username
command:echo "Hello this is command job"

To add this job in atosys db. Run following command from unix:

jil < echoJob.jil

This command will add "echoJob" job to autosys databse.

Commands to control the job

Start job command

sendevent –E FORCE_STARTJOB -J <job_name>

sendevent -E STARTJOB -J <job_name>

To put jobs on OFF ICE or ON ICE


sendevent -E OFF_ICE -J <job_name>

sendevent -E ON_ICE -J <job_name>

sendevent -E KILLJOB –J "Job Name Here"-- 


Thanks,
Srinivasan G

Thursday 5 January 2017

Creating User and Groups in OpenLDAP using Command Line

1) Creating User using ldapadd command:


2) Creating Parent Group and add other Group in it(Nested Groups)


Creating Users and Groups in OpenLDAP using phpldapadmin

Creating Organizational Unit

Follow the below Procedures for creating OU named Users and Groups

(i) Open the LDAP Web Console using the URL <hostname>/phpldapadmin and Click on the Distinguished Name (e.g dc=openldap,dc=com) and click Create a child Entry


(ii) Click on Generic: Organizational Unit


(iii) Provide a Name (e.g Groups) and click on Create Object


(iv) Now, click on Commit


The OU (Organizational Unit) named Groups is now created.


(v) Follow the same above procedures for creating OU named Users.


Now we have two OUs Users and Groups


Creating Users and Groups

1. Creating Users

(i) Select the OU Users and click on Create a child entry


(ii) From the Create Object page which appears, click on Default


(iii) Select inetOrgPerson from the ObjectClasses and click on Proceed >>


(iv) Select RDN as cn (cn). Provide cn name, sn name, displayName, Password, User Name and any other required fields and click on Create Object


(v) Now, click on Commit


Now, a user named ldapuser is created under the OU 'Users'


2. Creating Groups

(i) Click on OU Groups and click on Create a child entry


(ii)
Now, click on Default


(iii) Now Select groupOfNames from ObjectClasses and Click Proceed >>


(iv) Select cn (cn) as RDN. Provide a cn name, member (any one users, we can modify it later) and click on Create Object


(v) Now, click on Commit


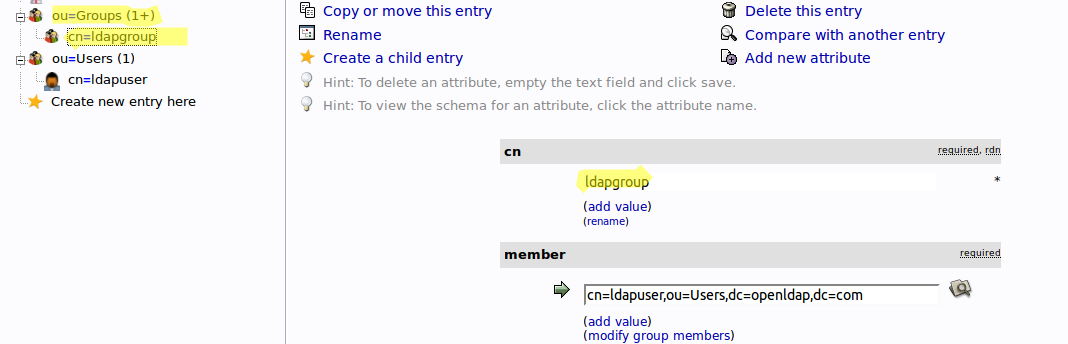
Group named ldapgroup is now created under OU Groups


3. Creating Groups with Special Characters(e.g ">>")

(i) Select OU Groups and click on Create a child entry.


(ii) Now, Click on Default.


(iii) Select groupOfNames from ObjectClasses and click on Proceed >>


(iv) Now cn (cn) as RDN and Provide the cn name. Escape ant Special Characters using
backslash (\) symbol.


(v) Now provide a valid user in member attribute and click on Create Object and proceed with Commit.


(vi) Now, group named OpenldapGroups is created under Groups OU with cn name Openldap\>\>Groups. The group will have another value in cn with the backslash (\) removed.


(vii) Now, Delete the entry Openldap\>\>Groups and click on Update Object and proceed with Update Object.


(viii) Now the Openldap\>\>Groups cn name is removed from OpenldapGroups and it is updated with cn name Openldap>>Groups


4. Modifying members in a group

(i) Click on modify group members from member attribute


(ii) From the Modify group page we Add or Remove Users based on our needs and click on Save changes

(iii) Now, click on Update Object to save the changes


Wednesday 4 January 2017

Integrating OpenLDAP with Websphere Application Server


WebSphere Integration – Creating Federated Repositories


(i) Open the IBM WebSphere Console using the URL https://<hostname>:<port>/ibm/console

(ii) Click on Security -> Global Security and select Federated repositories from Available realm definitions and click on Configure


(iii) Select Add repositories (LDAP, custom, etc)...


(iv) Now, click on New Repository and select LDAP repository


(v) Select unique Repository identifier and select Directory type as Custom. Enter Primary host name and Port number. Provide Bind distinguished name (an Open LDAP member) and Bind password


(vi) Now, click on Apply and Save the changes


(vii) Now provide unique Distinguished name and click on Apply and save the changes


We can now, see our repository from the Federated repositories page


(viii) Now, from the Global security page, select Federated repositories from Available realm definitions and click on Set as current and click on Apply and Save the changes.